5 minutes
Caplance Development Update 3
🎉 We made it! 🎉 After 6 months of work, Caplance is finally at MVP. The brief release notes can be found here.
To get to MVP, I had to implement the following functionality:
- Logging
- Config file parsing
Combining all the previous updates, we get the following feature set for the MVP:
- Packet listening
- Packet forwarding over UDP
- Direct reply from backends, allowing the load balancer to only have to handle incoming traffic
- Dynamic backend registration and deregistration
- Backend commands and health checks
- Logging
- Config file parsing
I’ll briefly cover the improvements so far and then give a short demo of Caplance working.
Logging
For logging, I decided to use the Logrus package. It’s frequently used by other packages, and it was super easy to switch to. I had already implemented logging with the log package from the go stdlib, so by importing log github.com/sirupsen/logrus in its place, I got instant compatibility. From there, I changed the log levels as appropriate. I’m using the following log levels:
- Debug
- Info
- Error
- Fatal
- Panic
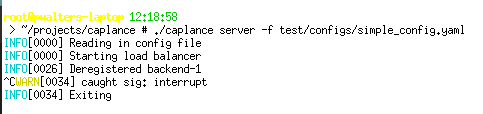
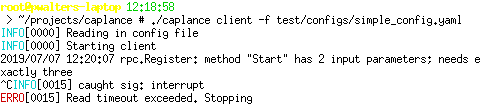
I’d like to eventually get away from panic and just call a graceful stop function with an error code, but that’s nitpicking pretty hard considering where Caplance is right now. Here’s a little demo of what the logging looks like:
Load balancer:
Backend:
Config File Parsing
For parsing configuration files, I used Viper. Viper allows me to use JSON, HCL, TOML, or YAML to write my config files so long as they follow my defined structure. The structure for configuration files follows this struct:
type config struct {
    Client struct {
        ConnectIP string
        DataIP    string
        Name      string
    }
    Server struct {
        MngIP           string
        BackendCapacity int
    }
    VIP  string
    Test bool

    HealthRate   int
    ReadTimeout  int
    WriteTimeout int

    Sockaddr string
}
The following defaults are also set:
viper.SetDefault("Test", false)
viper.SetDefault("HealthRate", 20)
viper.SetDefault("RegisterTimeout", 10)
viper.SetDefault("ReadTimeout", 30)
viper.SetDefault("WriteTimeout", 10)
viper.SetDefault("Sockaddr", "/var/run/caplance.sock")
In YAML, an example config file looks like this:
vip: 10.0.0.50

client:
  dataIP: 10.0.0.2
  name: backend-1

server:
  mngIP: 10.0.0.1
  backendCapacity: 53
This config file accepts all given defaults, only filling in the required fields. I’ll write more detailed documentation on the config file format soon, but for now, this will do. What’s really cool about Viper is that I can just tell it where to go looking for config files, give it a struct to put data into, and it does everything else for me:
func readConfig() {
    if configLocation != "" {
        viper.SetConfigFile(configLocation)
    }

    err := viper.ReadInConfig()
    if err != nil {
        log.Fatal("Failed to read in config: " + err.Error())
    }

    conf = &config{}
    err = viper.Unmarshal(conf)
    if err != nil {
        log.Fatal("Failed to unmarshal config into struct: " + err.Error())
    }
}
Here, I’m just telling Viper that if a specific config file location exists, use it. Then, I read in the config and unmarshal it into the conf struct for later use. Pretty cool stuff.
Demo
Now for the fun part! I’ve prepared a brief demo just to show that Caplance works as we expect it to.
In this demo, I’ll have the following hosts:
| Host | Description | IP |
|---|---|---|
| h1 | Load Balancer | 10.0.0.1 |
| h2 | Backend 1 | 10.0.0.2 |
| h3 | Backend 2 | 10.0.0.3 |
| h4 | Backend 3 | 10.0.0.4 |
| h5 | Client | 10.0.0.5 |
The virtual IP for the cluster that the client will be calling to is 10.0.0.50. Let’s start things up! I’m only going to show output from h1 and h2 right now, but h2 and h3 are showing the same as h2.
h1 $ ../caplance server -f confs/simple_1.yaml
INFO[0000] Reading in config file
INFO[0000] Starting load balancer

h2 $ ../caplance client -f confs/simple_1.yaml
INFO[0000] Reading in config file
INFO[0000] Starting client
2019/07/07 12:42:39 rpc.Register: method "Start" has 2 input parameters; needs exactly three
Now, I’m going to start nginx on the backends and see what happens when I curl from h1!
h2 $ nginx -p "" -c confs/nginx_1.conf

h5 $ ./repeat_curl.sh 10
Welcome to Onion Backend 2!
Welcome to Onion Backend 1!
Welcome to Onion Backend 2!
Welcome to Onion Backend 2!
Welcome to Onion Backend 1!
Welcome to Onion Backend 1!
Welcome to Onion Backend 2!
Welcome to Onion Backend 2!
Welcome to Onion Backend 3!
Welcome to Onion Backend 2!
Looks like it’s working! In this limited example, it seems that we’re probing 3 much less than the others, but that’s just random chance. If we run this over many more iterations and count occurences out, we see things level out:
h5 $ ./repeat_curl.sh 1000 | sort | uniq -c
    330 Welcome to Onion Backend 1!
    336 Welcome to Onion Backend 2!
    333 Welcome to Onion Backend 3!
Looks like things are working out! If you want to run this demo yourself, all the required files are right in the repo.
Conclusion
This was by far the most difficult project I’ve ever worked on, so having it done feels pretty surreal. Before signing off, I want to thank Davis, Armaan, and Ben for listening to me rant and rant about Caplance. Having an ear to talk to is unimaginably helpful when working on a project like this.
Despite some of the language I’ve been using, this is most certainly not the last work I’ll be doing on Caplance. I still have much to learn and features I want to implement. Until then, however, thanks for reading, and I’ll see you next time.