5 minutes
Building a Kudos Button
NOTE: FaunaDB the company died, so this approach no longer is in use. I work for Modal now, so I re-implemented the backend using Modal. Sadly I lost all my data, so please give me kudos if you like the articles!
When diving into WebRTC recently, I ran into this great article on the limitations of WebRTC, particularly related to its unreliability in doing NAT traversal. At the end of the article, I saw that it had this neat “kudos” button that when I hovered over it, upped the kudos count for the post. It turns out that kudos are a feature of the Svtle platform.
While I’m not interested in moving my site over to Svtle, I wanted that button, so I decided to make it. The button is comprised of 3 main parts:
- CSS animation for the expanding/contracting and the color change
- Netlify serverless function for tracking kudos count
- Client-side JavaScript glue to hook up the animation to the serverless function
CSS
When I started coding (2013ish), CSS quickly became my mortal enemy. Nothing made sense to me, and the rules felt very inconsistent. So much so, in fact, that I quickly gave up on writing my own CSS and just used Bootstrap (now Bulma) for every project moving forward. Naturally, this had me dreading working with CSS for this project.

An infrastructure guy tries to use CSS (2020, colorized)
Once I got past some initial bumps, though, I found that it turns out that 7 years of CSS improvement and Sass really have made CSS much friendlier. The way the final animation works is roughly:
- Start the dot off as a small size,
$dotSize - On hover, fill out to the size of the ring,
$filledSize. Animate just using thetransition: 1sattribute. - After 1s of hovering, run some JavaScript (timing method described below) to change the ring and circle classes to
filled, which gives them a green color and the circle a slightly smaller size than the ring. Transition time0.2sfelt right for this.
These steps created a nice pop out and back in that I liked, so now I could move on to writing my server-side functions.
Netlify Functions
Before this, I had been hosting my site on Github Pages. Pages worked great for me since I had no dynamic content, but this button threw a wrench in that. Moving my site over was largely uninteresting (to Netlify’s credit), so I’ll just focus on the functions here.
For storing like counts, I use FaunaDB, a serverless database with a generous free tier. Fauna is super easy to set up with Netlify. I’ll note how to bootstrap at the end of this article. In my Fauna collection, I store documents that contain the title of the article with a list of which client IDs have given it kudos. Example:
{
  "title": "automating-k3s-deployment-on-proxmox",
  "users": [
    "bb344507-a78f-4c6d-a71d-362056a8e6d8",
    "e894ef53-7a4a-4b6b-b081-e28adba82a04",
    "755408c9-f671-4ff0-b577-30c8075f3936",
    "768839bf-39b6-432e-96f2-38d5e1aa575a",
    "8ce3057f-22bb-47d7-9c29-c2dad1205fa0"
  ]
}
Once I hooked up Fauna, I simply created two serverless functions:
get-kudos.js- This returns a JSON response with the number of kudos and whether or not the current user has given the post kudos. Example:{ "numClicked": 5, "userClicked": true }add-kudos.js- This adds the current user to the list of users who have given kudos to a post.
Client-side JavaScript
To keep track of which users had liked which post, I generated UUIDs according to the UUIDv4 spec and stored them in local storage. At page load, I simply make an AJAX request to my get-kudos function to check if the logged in user has given the page kudos. If they have, I immediately add the filled CSS class to the ring and circle.
For keeping track of whether or not the user has hovered in the circle for 1 second, I used the mouseenter and mouseleave events. I have a variable lastTime which starts of as 0. When you enter the circle, lastTime gets set to the current UNIX time and a 1 second delayed function gets dispatched. When you leave the circle, lastTime gets set to 0.
After one second of entering the circle, the aforementioned delayed function is run which checks if lastTime is 1 second or more before the current time. If it is, the add-kudos request is sent off, and the ring and circle becomes filled!
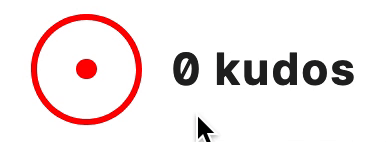
This completes the code, creating the kudos effect:
On Your Site
This button is pretty self-contained, so it shouldn’t be too hard to add to your own site if you’re hosted on Netlify. Here are some rough guidelines:
- Copy over my functions directory
- Hook up FaunaDB and rename your database to
personal-site$ netlify addons:create fauna $ netlify addons:auth fauna # now go in and change your database to personal-site $ cd functions $ npm install $ netlify dev:exec node createdb.js - Copy in my kudos JavaScript and kudos SCSS into your project and import them into your page
- Add a kudos container to your post template
- Make sure your
netlify.tomlis set tonpm installfor your functions.
Conclusion
After not doing any web development for so long, it was good to stretch those muscles a bit. With Hugo and Netlify, this process required basically no infrastructure work on my part, which was exactly what I was looking for.
Hopefully this was helpful, and if you enjoyed this article, feel free to give me some kudos :)